By Mauraine Bos – The Sansin Corporation, and Sandeep S. Nair, Research Scientist

Pressure Treated Deck_2yr_Pressure Plus
Direct Performance Comparison
Hosting barbeques, pool parties and events are what summer is all about. It might surprise you to learn how the practicality of your real wood deck delivers a more comfortable and superior experience to composite decking. Throughout its life span we expect our deck to hold up to the wear and tear of daily activity. While composite decking is perceived to deliver similar structural integrity and durability, wood has proven to be more sustainable, durable and more comfortable than composite alternatives. From better thermal properties to a lower carbon footprint, wood proves to be the more practical choice.
- Comfort – Composite decks get hot. Composite material absorbs solar energy and radiates it, creating hot surfaces, while real wood insulates naturally, providing a more comfortable walking surface. Comparing walking across a wood deck and a composite deck reveals distinct differences. Wood feels better and more ‘sure-footed’, especially when the weather fluctuates. Composite materials vary dramatically in characteristics that impact their surface, often making them more slippery. Composite materials react quickly to changes in humidity and temperatures compared to wood. Without the ability to absorb moisture, the moisture will sit on top of the composite material. This, combined with the hardness of the surface, results in lower friction and increased slip risk.
- Sustainable – When sourced sustainably, wood is the world’s only primary natural and renewable building resource. Solid wood products have the lowest embodied energy* (the total amount of energy required for the product lifespan, from harvest to usage to disposal) when compared to any composite or engineered building materials. Wood stores carbon for its lifespan, therefore reducing the carbon emissions. Real wood emits less greenhouse gases than any other plastic or in-organic based composite product.1-3
- Strength – Wood is composed of parallel strands of strong cellulose fibres held together by lignin. Wood can withstand high stress and distribute load evenly. The optimal grain direction, and denser wood, provides great compressive and flexible strength. Studies confirm the tensile and flexural strength qualities of solid wood is much higher than wood plastic composite materials.4-6
- Durability – Certain species, like redwood and cedar, are naturally rot resistant and insect resistant, making these substrates ideal for building decks. Durability refers to the inherent resistance of wood from attack primarily by wood destroying organisms. The crystalline portion of cellulose is resistant to microbial attack, while the lignin protects the non-crystalline portion and other carbohydrates. Most wood species also have extractive compounds which are the primary source for decay resistance. These fungitoxic compounds are one of the major constituents of heartwood that prevent wood decay.7,8 Penetrating, breathable, non-film forming wood coatings can add durability and protect woods character, even through freeze-thaw climates.
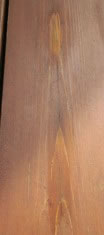
- Beauty – Wood is natural and brings biophilic properties to any structure. Real wood has grain and character that is unique and cannot be replicated – no two pieces of wood are exactly alike. Wood fibres grow in response to climate and location; the various wood species and growth patterns offer diverse aesthetic opportunity. Wood adds a calming presence due to its natural sound absorption properties, contributing to the overall atmosphere.
- Lower Cost – Price is always important. What is the difference in cost of materials? We compare average online costs of 5/4 x 6 – 12 foot pressure treated lumber, Western Red Cedar, and composite decking. Pressure treated sits at an average of $12.00, Western Red Cedar at $25.00, while a composite decking board costs upwards of $55.00. On average, Western Red Cedar costs less than half the price when compared to composite decking.
- Zero Waste – Real wood can be reused and recycled in many ways, such as using the material for another project, or as a source of fuel or energy at the end of its useful life in a deck. Unfortunately, composite materials will end up in the landfill, as the material is difficult and expensive to recycle at the end of its life.
- Feel good buying real wood. If you have or are planning to build with real wood, you can feel great about your commitment to the environment. Not to mention its beauty, durability, and the money you’ll save.
Environmental Benefits of Wood
Studies of the lifecycle assessment of composite materials show that composites have a significantly greater, negative, environmental impact than wood1-2. In the graph below, notice the composite materials and polyvinyl chloride (PVC) reflect poorly when compared to redwood.
Impact of life cycle assessment of composite materials and PVC vs. Redwood

Figure 1. Impact of life cycle assessment of composite material and polyvinyl chloride (PVC) vs. Redwood decking. The composite with the highest value for each impact category is used as the reference. Global Warming for PVC decking is 426kg CO2 eq is 100% reference. Ozone depletion for PVC decking is 1.60e-5 kg CFC-11 eq is 100% reference. Smog for virgin wood plastic composite decking is 36.3kg O3 eq is 100% reference. Acidification for virgin wood plastic composite is 5.94kg SO2 eq is 100% reference. Eutrophication for virgin wood plastic composite is 0.237kg N eq is 100% reference, and respiratory effects for virgin wood plastic composite is 0.338kg PM2.5 eq is 100% reference.1
The life cycle impact assessment quantifies the impact of each material listed within its category. Real wood offers significant environmental benefits compared to composite materials and plastics within all six environmental measures including global warming, ozone depletion, acidification, eutrophication, smog, and respiratory effects. Notice, composite materials made with virgin plastics are not only demonstrating worse effects than wood, but also polyvinyl chloride (PVC), in the case of smog, acidification, eutrophication, and respiratory effects. Redwood has a net-positive impact on global warming as it is a living, breathing material, and through photosynthesis, absorbs carbon dioxide (CO2) acting as a carbon store. Real wood’s ability to biodegrade, and lower carbon footprint make it an eco-friendly option that supports environmental conservation.

Figure 2. Global warming potential of terrace made of various building materials
Within the graph above, notice that concrete, wood plastic composite materials and various wood species are compared for their impact of global warming potential. Wood plastic composites have the largest global warming potential compared to wood and concrete.
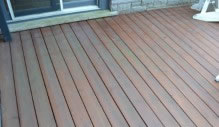
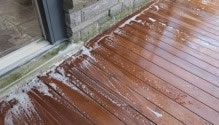
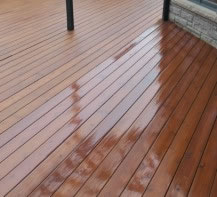
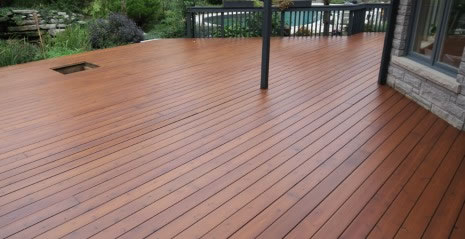
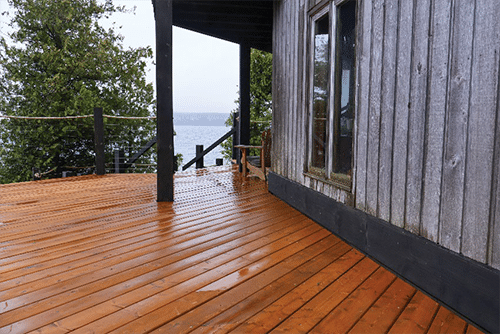
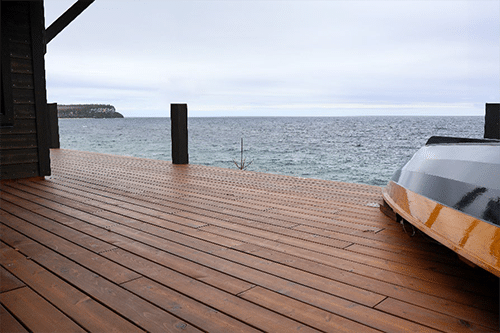
The benefits of using real wood are indefinite. Real wood can be protected and enhanced as well as tailored to unique aesthetic objectives. Look at this deck for example:
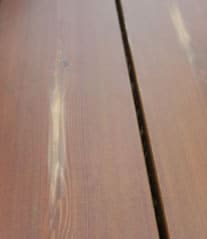
Exposed for 2-years. Notice the decking boards are not warping, cupping, cracked or showing signs of wear. The decking boards are maintaining their beauty, displaying durability, and will continue to do so. The coating system used on this deck is 1-coat Sansin Dec – Banff Brown, and 1-coat Sansin Dec Naturals Topcoat. Maintenance will be expected every 3-4 years.
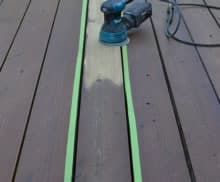
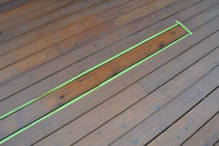
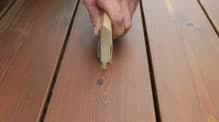
Notice the copper flashing, sealed end grain, and spacing considerations used to build this deck. Good design features like this contribute to the performance of wood.

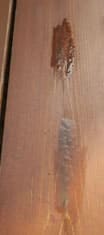
End Grain is coated with Sansin Dec preventing moisture absorption. Copper flashing is used to prevent water damage.

Spacing is built into the deck at each joint to allow the deck to expand and contract and dry thoroughly.
In conclusion, real wood stands out as the preferred choice for decking due to its environmental sustainability, strength, durability, aesthetic appeal, comfort, safety, and cost-effectiveness. Unlike composite materials, real wood is a natural and renewable resource that stores carbon and reduces emissions. Its strong cellulose fibers provide superior tensile and flexural strength, while certain species like redwood and cedar offer natural resistance to rot and insects. The unique grain and character of real wood contribute to its beauty and calming presence in outdoor spaces. Additionally, wood decks provide secure footing and are significantly lower in cost than composite options. At the end of its life, real wood can be reused or recycled, reducing waste and environmental impact.
References
- Bergman, R., Sup-Han, H., Oneil, E., & Eastin, I. (2013). Life-cycle assessment of redwood decking in the United States with a comparison to three other decking materials. Life-cycle assessment of redwood decking in the United States with a comparison to three other decking materials. To be published to the Web at CORRIM. ORG.; 2013; 101 p., 1-101.
- Erlandsson, M., & Laurenti, R. (2018). LCA on NTR treated wood decking and other decking materials.
- Ramachandran, K., Gnanasagaran, C. L., & Vekariya, A. (2023). Life cycle assessment of carbon fiber and bio-fiber composites prepared via vacuum bagging technique. Journal of Manufacturing Processes, 89, 124-131.
- Arnandha, Y., Satyarno, I., Awaludin, A., Irawati, I. S., Prasetya, Y., Prayitno, D. A., … & Amalia, A. (2017). Physical and mechanical properties of WPC board from sengon sawdust and recycled HDPE plastic. Procedia Engineering, 171, 695-704.
- Adhikary, K. B., Pang, S., & Staiger, M. P. (2008). Dimensional stability and mechanical behaviour of wood–plastic composites based on recycled and virgin high-density polyethylene (HDPE). Composites Part B: Engineering, 39(5), 807-815.
- Dias, Z. D., & Alvarez, C. E. (2017). Mechanical properties: wood lumber versus plastic lumber and thermoplastic composites. Ambiente Construído, 17 (2): 201-219.
- Segerholm, B. K., Ibach, R. E., & Westin, M. (2012). Moisture sorption, biological durability, and mechanical performance of WPC containing modified wood and polylactates. BioResources Volume 7, Number 4, 4575-4585; 2012., 7(4), 4575-4585.
- Wu, W., Li, P., Huang, L., Wei, Y., Li, J., Zhang, L., & Jin, Y. (2023). The role of lignin structure on cellulase adsorption and enzymatic hydrolysis. Biomass, 3(1), 96-107